Introduction
Let’s make our website look nicer with some styles. In this lesson and the next we are going to learn how to change colour, text, sizes and more!
We style HTML pages using a language called CSS (which stands for Cascading Style Sheets). It is a very simple language to learn. Let’s get started.
Step 1: Setting up to write some style
There are many ways to add styles to your HTML: inline, in the head, or as a separate .css document that we link to from the head. But today, we’ll be using styles in the head element of our html page so we don’t have to worry about handling multiple files.
Activity checklist
- Open the index.html from the Felix folder we did last session.
- In the head section, we need a style tag.
<style>
</style>
selector {
    property: value;
}- Can you find the ‘{‘ and ‘}’ keys on your keyboard?
- How about ‘:’ and ‘;’?
Selectors can be html elements like h1, p, img, a. But they can also be other things which we will learn later.
Step 2: Adding Colours
Let’s add some colour with the color property! It’s color without the u. Yes we think it’s confusing too. It’s because it’s using the American spelling of the word, despite the fact that CSS was invented by a Norwegian person. You’ll get used to it soon enough, just don’t forget the English spelling in your English lessons!
Let’s change the h1 to be red instead of black.
h1 {
    color: red;
}
SAVE your file and VIEW it in your browser
The text is now red, w00t! There are different ways of saying the values for the color. There are 16 basic color names, they are aqua, black, blue, fuchsia, gray, green, lime, maroon, navy, olive, purple, red, silver, teal, white, and yellow.
Try changing the color to something else! Most browsers support an additional 130 color names, a full alphabetical list of which is found at http://www.w3.org/TR/css3-color/#svg-color - is your favourite colour in the list?
- But we can use even more colors by using hexidecimal code instead of color name. A hexcode is a # followed by 6 digits, the digits can be 0-9 or the letters A, B, C, D, E, F. Using hexcode we can use more than 16 million colours!
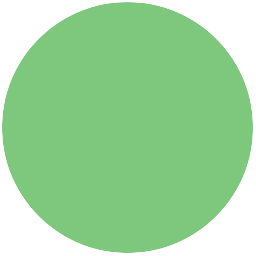
At Code Club, our favourite colour is
#58AB57. Can you guess what colour it is? Why don’t you try changing some text to that colour and view it in a browser to see.
SAVE your file and VIEW it in your browser
Step 3: Colouring specific elements
What if we wanted to make the word ‘orange’ in ‘his fur is orange’ orange? Not the whole paragraph, just that word.
One way of doing that is putting <span> tags around the word, like so:
<span>orange</span>
Then in the head, we can style the span.
span {
    color: orange;
}
SAVE your file and VIEW it in your browser
Step 4: Background
We can add colours to the background too, not just text. For instance:
body {
    background-color: #D2FAFC;
}
This will make the entire background light blue. You can choose any colour you like from a list at www.colourpicker.com which generates the number you need which you can copy and paste into your code.
Now try:
h1 {
    background-color: black;
}
Since we already had a h1 declaration in there, we could just put in the background-color with the color, no need to write it all out again.
h1 {
    background-color: black;
    color: red;
}
Now SAVE your file and see what it looks like.
Fun with text
Maybe the ‘Missing’ header should be bigger and also all capital letters. We can specify the size of the text using font-size. The values can be many things, but the most common are 12, 14, 16, 32, 48 and 72 pixels. For now lets try 72px. (px means pixel).
h1 {
    background-color: black;
    color: red;
    font-size: 72px;
}
Now try making the heading capital letters only by using text-transform:uppercase; We can also make it underlined by using text-decoration:underline;
Now SAVE your file and see what it looks like.
It’s much more noticeable now right?
Step 6. Centering text (and images) horizontally
All our text is all the way over on the left. We can change that using text-align:center (it also takes ‘right’, ‘left’ is the default).
- We want all our text to be centered for this particular webpage, so we can write: Note the American spelling of the word centre is center.
body {
    background-color: #F8FAF4;
    text-align: center;
}
Did you notice that everything in the page went to the centre when we put ‘text-align: center’ in the body section? That’s because everything inside the body element inherits the style. This happens whenever one element is inside another, like here:
<p>Have you seen Felix? <em>Please</em> contact his owner</p>The ‘Please’ will have the style of the <p> element with the style of the <em> element added on. This is why the stylesheets are called cascading - the styles cascade from elements into all the ones inside them. Be careful, though, because some styles are not inherited. We will find out about these later.
Now SAVE your file and view it in a browser
Further study
- How would you change the page to make it look better? Why not try using all your favourite colours? Do they have colour names or do you need to use hexcode?
- If you finish early you can go back and add styles to the html we made in previous lessons.


